
July 15, 2026
The Hidden Infrastructure Behind Successful Investment Funds
Your fund's strategy only takes you so far. Discover the operational infrastructure that institutional investors evaluate before they commit.
Read More
Business
As a mindfulness practitioner, event planner, and small business owner, one thing that might have crossed your mind is how to make candles at home. The thing is, it’s easier than most people think.
DIY candle making takes a little patience, a few supplies, and a good candle recipe. That’s it. No massive startup costs. No steep learning curve.
This candle-making guide breaks down the process into simple steps. You’ll get the basics, plus real advice on scents, safe ingredients, and costs. Want to create gifts, start a side hustle, or just enjoy the craft? You’ll find everything you need right here.
📖 YOU MIGHT ALSO LIKE
Look at any candle. It starts with three simple things: wax, a wick, and something for fragrance.
Get these ingredients right, and you set yourself up for success. The rest is just practice.
Most candle-making instructions start here. Pick your materials with care, and you’ll enjoy every step of the candle-making process.
Choosing the right wax is where your candle starts to take shape. Each type brings something different to the table. With the right materials to make candles, your results will only get better.
Here’s a tip: Mixing waxes is a game changer. Try pairing soy and coconut for a silkier finish, or add a touch of beeswax if your soy feels too soft.
For the melting process, go slow and steady. Use wax pellets or blocks. Always weigh your materials to make candles accurately. Melt them in a double boiler, never directly on a flame, as wax can catch fire.
For more details on wax types, check out this candle wax guide.
To learn how to make candles from scratch successfully, you’ll want to have a few essentials ready.
The materials to make candles aren’t complicated, but picking the right tools sets you up for success. Start with a heat-proof pouring pitcher and a digital scale that can measure down to a fraction of an ounce.
A kitchen thermometer to help you watch your wax temperature. Grab a silicone spatula or a simple wooden stir stick for blending.
Jars, metal tins, or silicone molds all work for pouring your candles. And you will need to secure your wicks with sticky tabs or a dab of hot glue.
Don’t forget gloves and a silicone mat; cleanup is easier than you think.
With just these ingredients to make candles, you’re ready to follow any beginner candle recipe. Most of these supplies cost less than forty dollars to gather online, making it simple to jump right in.

Making a candle involves three main steps: melting the wax, adding scent/color, and pouring and curing. Keep things clean, precise, and don’t rush the curing; this makes all the difference.
Start by setting up a double boiler. Pour a few inches of water into the bottom pot and bring it to a gentle simmer. Place your measured wax in the top section.
This method gives you full control over the heat and helps you avoid scorching.
Keep an eye on the process. Stir the wax as it melts to prevent hot spots and make sure everything blends evenly.
This is how to make candle wax the right way; slow and steady wins here.
Use a thermometer probe to check the temperature. For soy wax, aim for a temperature of 170 to 180°F. Beeswax does best between 180 and 185°F. Careful temperature control at this step sets the stage for a smooth, flawless candle later on.
Let your melted wax cool to around 150°F before adding anything extra. This is the perfect “fragrance temperature” as it keeps your scents strong without burning them away.
Choosing between fragrance oils and essential oils changes your results. Fragrance oils usually have more impact, but some contain phthalates.
Essential oils are natural, but you’ll need to add a bit more for a strong scent. Try different essential oil candle recipes to discover which blends you like best. You can buy essential oils in bulk here.
Get your ratios right and you’ll end up with candles that fill the room with beautiful fragrance.
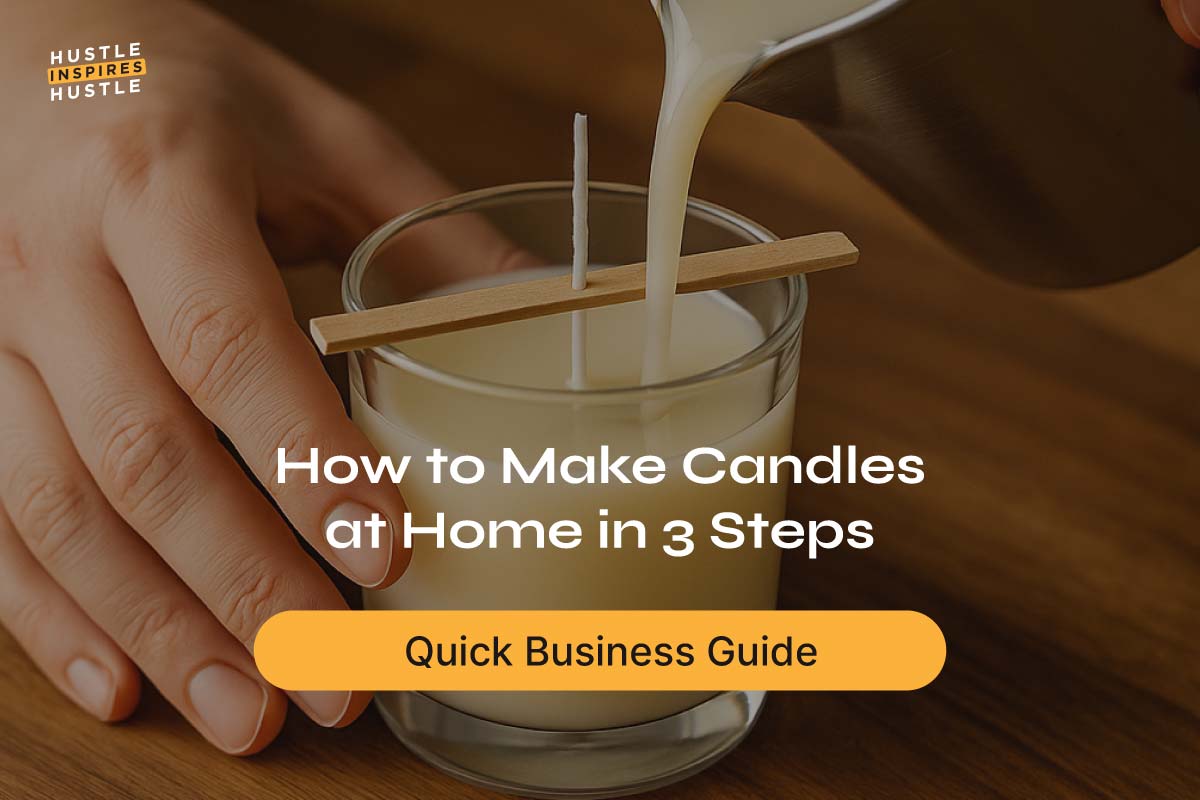
Place your wick right in the center of the jar or tin, using a wick sticker, tab, or just a small dot of hot glue to hold it steady. Pour the melted wax slowly into your container, aiming for a temperature between 140 and 150°F.
This careful pour helps prevent bubbles and sinkholes from forming as your candle sets.
Once filled, gently tap the side of the container to release any hidden air bubbles. Watch as the surface starts to form a thin skin; give it 15 to 30 minutes to set undisturbed.
After that, patience is key. Let your candle cure for at least 24 to 48 hours before lighting it for the first time.
This wait allows the wax and fragrance to fully bond, giving you the best possible scent throw and an even, satisfying burn.
Starting out? Stick with the basics. The best way to learn is by making soy wax candles or a simple beeswax blend. Here are two beginner-friendly candle recipes:
As you mix in your scent, the wax might turn a little cloudy. That’s totally normal.
When you smell the unlit candle (the “cold throw”), the scent is lighter. After curing and burning, the fragrance grows stronger, a sign your process worked. If your candles smell faint, boost the scent load or test another oil. Experiment and enjoy the process.
If clean air and safety are important to you, making non-toxic candles is simple.
Choose soy, beeswax, or coconut wax for a clean burn. Go for phthalate-free fragrance oils or pure essential oils, and always use cotton or wooden wicks.
Natural colorants like mica powder add a pop of color without harsh chemicals.
For the best results, skim the surface of your melted wax to remove impurities before pouring. If you see the candle sink as it cools, add a little more wax on top.
And before making a big batch, test with small melts; each scent reacts differently in the wax.
Non-toxic candles are particularly suitable for meditation or mindfulness practices. Clean-burning scents like lavender, sandalwood, or eucalyptus can help create a calm, focused space where you can breathe easy and reset.
Soy wax works beautifully with essential oils, but pay close attention to your temperatures. If it’s too hot, those delicate scents can fade.
For a fresh citrus-mint candle, combine 8 ounces of soy wax with ten drops of sweet orange and six drops of peppermint.
Stir for 45 seconds at 145°F, then pour at 140°F. For something herbal, try 8 ounces of soy wax with eight drops each of eucalyptus and rosemary.
Stir for one minute and pour at the same temperature. With the right approach, making soy wax candles with essential oils is straightforward and rewarding.
If you want your space to smell amazing, start with balanced essential oil blends. For relaxation, try a mix of lavender and chamomile, soft, floral, and soothing. If you need something bright and energizing, rosemary and lemon together bring an uplifting, herbal-citrus kick.
Craving warmth? A cozy blend of cinnamon and clove gives a rich, spicy aroma perfect for any evening.
After mixing your chosen recipe into the wax, let your candles cure for at least 48 hours. This extra time helps the fragrances meld, so you’ll get a strong scent both before and after lighting your candle.

Making a candle at home usually costs between five and ten dollars.
Wax for an 8-ounce candle runs about $2 to $4, fragrance adds $1 to $3, wicks are just a few cents, and containers range from $1 to $2 each.
Buy your materials in bulk, and you can cut costs by up to half.
Expect to spend about ten minutes prepping, fifteen to melt wax, a few more to mix and pour, and then wait a day or two for curing. Candle making stays budget-friendly, especially if you make more than one at a time.
To figure out the right amount of wax, fill your jar with water and measure the volume using a standard measuring cup. For most candle wax, one fluid ounce of volume equals about one ounce by weight.
It’s a good idea to make a little extra, add five percent more wax than your measurement.
This covers any shrinkage as the candle cools and helps you get a perfect fill every time. Simple math, no guessing needed.
How long does it take to make a candle? Candle making doesn’t take all day, but some steps are faster than others. Here’s a simple breakdown:
The last step is the hardest: curing. Plan for 24 to 48 hours so your candle fully sets and the scent develops. To save time, make several candles in one session. Most of the work is hands-off, and batching makes it even more efficient.

Once you’ve got the basics down, it’s time to experiment. Try layering different scents in the same candle for a unique effect as it burns.
You can embed dried flowers, herbs, or even small crystals to create candles that stand out visually and offer something extra. Custom molds let you play with new shapes, giving your candles a signature look.
If you’re thinking about selling, consider designing your own labels and packaging. Thoughtful branding makes your candles memorable.
Done right, candle making can grow into a profitable small business. With low startup costs and high demand, it’s one of the most accessible ways to turn creativity into income.
With the right tools, clear steps, and a few solid recipes, making beautiful candles at home is within reach for anyone.
There’s plenty of room to experiment, mix new wax blends, try unexpected scent combinations, and explore different containers until you find your style.
Share your finished candles with friends, or post photos on social media to see how people respond. You might even want to test the waters by selling a few on online marketplaces. Etsy is a great starting point for handmade and small-batch goods, while Amazon Handmade gives you access to a massive audience looking for quality, handcrafted products.
For many women, it’s become more than a hobby. It’s a flexible, creative side hustle that fits around family, work, or whatever else life looks like.
The next step is simple: light your creativity and see where it takes you.
Elevate your entrepreneurial game with actionable advice and inspiring interviews from high-level entrepreneurs, business owners, and overall badasses in the game. Get more insight and inspiration on our blog posts, podcast episodes, or invite-only community.
From start to finish, most DIY candles take about an hour of active time, prep, melting, mixing, and pouring. Add another 24 to 48 hours for curing before you light them. If you batch your candle making process, you can make several at once and save time.
To make your own candles at home, gather your materials to make candles: wax, wick, container, and fragrance. Follow a step-by-step candle making guide: melt the wax, add scent and color, pour into your container, and let it set. With practice, homemade candles come together quickly and look professional.
You typically don’t need FDA approval to sell DIY candles, but you do need to follow safety rules and use safe, approved ingredients to make candles. Label your products accurately and check any local business regulations before selling your creations.
A simple candle recipe uses wax, a wick, fragrance oil or essential oil, and sometimes color. Some advanced recipes call for botanicals or unique additives, but most candle making instructions keep it basic for the best results.
The 84 Candle Rule isn’t a strict rule, just one maker’s advice: make at least 84 candles before going pro. It’s about learning the craft first. Smart idea, but not always doable for everyone starting out on a budget.
* A paid link placement has been included in this post to support our publishing efforts.

Alex Quin is a full-stack marketing expert and global keynote speaker. Founder and Chief Marketing Officer of UADV Marketing - a member of the Forbes Agency Council.